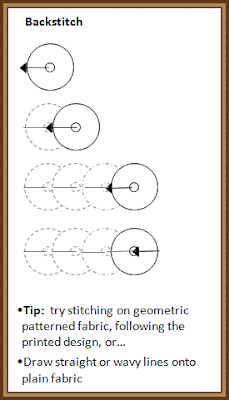
I guess this is called backstitch. Because you're stitching backwards on the top. As opposed to running stitch, where you'd be stitching forward. Whatever it's called, this is the trick for getting perfect spacing and overlap when stitching a line of sequins. I learned it from Al from South Beach. 8-)

TOOLS & MATERIALS
- flat sequins
- thread
- needle
- fabric
- scissors
You won't need any seed beads for this stitch. And, these instructions assume you'll be beading a line from left to right.
STEP BY STEP
1. Knot the end of the thread, slip the needle onto the other end, and come up from the back of the fabric where you want your line of sequins to start.
2. Slip on a sequin, and then stitch down to the left, coming back down through the fabric just at the left edge of the first sequin.
3. Come up just at the right edge of the sequin, slip on another sequin, and then stitch down through the center of the first sequin.
4. Come up just at the right edge of the second sequin, slip on a sequin, and stitch down through the center of the previous sequin. Get it? Keep doing that. 8-)
5. When you get to the end of the line of sequins, tack down the outer edge of the final sequin, then knot on the back of the fabric and snip the thread.
TIP: To get straight and/or smooth flowing lines, draw guidelines onto the fabric, or practice on a swatch of patterned fabric and follow the designs.
~~~~~~~~~~

Oh, this tute ROCKS! Thank you so much! I've scheduled a link to this post to go live on my blog later this morning (Central USA time). I hope it brings you a few extra clicks.
ReplyDeleteDenise
http://needlework.craftgossip.com
Thank you Denise! So glad you like it. 8-)
ReplyDeleteThanks for the info. I have never used flat sequins, but I have them and now I am going to try them in a future BJP page.
ReplyDelete