Friday, December 19, 2014

Interweave Winter Solstice Sale 40% off

This one-day-only sale happens on Sunday, Dec. 21...

Save 40% Off at Interweave with Offer Code WINTER40
I covet crave like to look at all of the Interweave videos, DVD's, books
and tutorials. My faves are the beadwork and mixed media sections...
~~~~~~~~~~


Saturday, December 13, 2014

New Vintage Sequins in My Shop This Week

Here we go. Digging out. More sequins are on the conveyor belt! Meanwhile, in my Etsy shop, just a few new colors of beautiful vintage French and Belgian sequins by the strand. The cream of the crop for surface embellishment, bead embroidery, knitting and crochet, These come straight off the hank, in pristine condition. Most 1950s, maybe 1960s.


 ~~~~~~~~~~

Friday, December 5, 2014

Free Holiday Coloring Pages

From Dover Publishing, a couple of coloring pages for the winter holidays. You can sign up for a bunch of clip art newsletters at Dover, and receive an email every week with links to free clip art: http://e.doverpublishing.com/dover_prefcenter_user.jsp

Click the image to download a bigger picture...

Click the image to download a bigger picture...
~~~~~~~~~~

Monday, November 24, 2014

New Video: Your Basic Bead Embroidery Sandwich

Check out my new YouTube video about how to construct a bead embroidery project. It covers the basic materials: beading surface, backing, reinforcement and findings. I hope you find this helpful, especially you beginners out there.

NOTE: To view this in a larger size, click the YouTube or 
Full Screen icons at the bottom of the video screen.
~~~~~~~~~~

Friday, November 21, 2014

Bead Embroidery Live Webinar Tuesday, Nov. 25

Bead Embroidery: Techniques &
Inspiration from Mary Tafoya
Here's some exciting teaching news! Early next week, on Tuesday, November 25, I'll be presenting a webinar for Interweave Press on my favorite bead embroidery tips and tricks! We start at 11:00 a.m. my time (Mountain) and 1:00 p.m. EST.

Jennifer from Beading Daily and the other folks have done a great job with the registration page, bio and PR, so I'll just link to them below...

...but KEEP READING to get some top secret info (shhh!) down below, just for the readers of my foolish bloggishness.

Bead Embroidery: Techniques and Inspiration from Mary Tafoya -- Register here, or purchase the download (If you attend the live webinar, you also get the download! Plus you get to ask questions during the webinar.) Also a nice long description of everything we'll cover.

Meet ... Mary Tafoya (a quick interview at Beading Daily) Read this and decide. Ha!

Ok, dear readers, here's a sneak peek at what we'll cover:
Road Trip detail, glass beads,
sequins, mixed media
  • First, I'll show you a couple of basic bead embroidery stitches you can use to create just about any design you want. Then, when the shock wears off at how simple they are, we'll move on to some basic materials and how to stack them.
  • Next, I get to brainwash inundate persuade blather show you some examples of things like how to get your lines really straight, or not! And, what circles look like. No, seriously, you'll get to see super closeups of various techniques with lines, including layering them for a bit of dimension.
  • After that we'll jump onto my favorite topic: COLOR and how not go to too crazy with it, Unless you want to...
  • The real meat and potatoes of the webinar (or beans and rice if you're vegan) are probably the sections on dimensional effects and working with found objects. I think everyone will like them, but especially the experienced beaders. I hope!
  • Finally, I'll show you some of my fancy finishing techniques, and explain how I constructed a wall hanging.
  • Once I've talked your ear off, it will (finally) be time for you to ask questions! The great folks at Interweave will make sure that No Question Goes Unanswered. If we don't get to you, we'll collect your Q's and send everyone the A's after the session.
Again, if you attend the live webinar, you also get the download.
Hope to see you in virtual beadland next Tuesday!
~~~~~~~~~~

Tuesday, November 18, 2014

Recycled Photo Frames

I love to pick up used picture frames at the thrift store and decorate them with buttons, game pieces, and other odds and ends. They make nice mirrors, and bulletin boards, too, to sell or give as gifts. Recently I decorated a couple of frames using goodies our friends gave us...

These two old tins were given to us by two different friends.
Both full of priceless treasures...

My fictional fiddlin' forebear, Otis Ham Waddle!
Found this school-themed wooden frame with rulers
along the edges, and added a heaping helping of vintage
buttons, buckles, and fossils all the way from Ohio.

Here's a sweet vintage frame of silver leafed wood, 
decorated simply with shell buttons from the flowered button tin.
I'll leave it to my friend to add a photo of her own.
~~~~~~~~~~

Tuesday, November 4, 2014

Brilliant Idea No. .0002 -- Cork Stands!

Click the image for a closeup!
These wee cabinet-photo cutout folk were lying around (literally) and I wanted to prop them up so I could play with them. But I didn't feel like cutting, folding, and gluing card stock for little stands. Which is when I spied my jar of corks...

So here you go. Find a big cork and set it on the table, wide end down. Saw through the center of the narrow end, back and forth, using a sharp knife or craft blade (Kids, ask a parent. Knives are sharp). Squeeze the sides together to stabilize the cork and saw gently. Cut a slit about halfway down the cork.

And voila! Slip in the cabinet photo (or other creation), and it stands up just right.
~~~~~~~~~~

Sunday, October 26, 2014

Wild Hair Jewelry Fixin's

It all started when I innocently got out my jewelry tools, thinking to make some earrings with my new carved animal beads. Next thing I knew...

Carved buffalo bone beads, faceted coral, turquoise heishi, sterling silver
Got the carved horse and buffalo fetish beads at New Mexico Bead and Fetish in Old Town. They're Zuni made -- I misplaced the card with the carver's name, but in addition to these beads made from buffalo bone, he also makes dragonflies and other fetishes from mussel shell! (See my previous post.)

Everything else below (except the skull beads) is made from vintage jewelry components, including the rhinestones.
Click the image for a closer look!
Love my precious little violin charm stampings! They're made from one piece of metal, die cut and then folded, held in place by little tabs! My Novia (sweetheart) brooches were a rare find -- think they'll do well down at OFFCenter. Set the various rhinestones into the skulls and butterflies, too.
~~~~~~~~~~


Sunday, September 28, 2014

Mussel Shells and Vintage Buttons

Gift mussel shells from the Little Miami River...
...and old buttons made from the same type of shell.
The purple ones are rare! Beautiful, lustrous lavender plum,
ranging to opalescent dusty pink.

Freshwater mussel shells were used in the U.S. from the 1800's to produce millions and millions of buttons, as well as cutlery handles, inlay and other products. (Before that, I guess the shells were mostly used as tools by indigenous North Americans.) But by the 1930's, over-harvesting, decline in mussel habitat, and eventually, alternative technology and materials put an end to the river-based shell industries all along the Mississippi and other eastern waterways.
~~~~~~~~~~

Thursday, September 18, 2014

Vintage Beaded Purse To Dive For

Look what the MOTH found at the bottom of a huge bin at Goodwill:

This vintage bead crochet purse is huge! 8" wide and 12" tall.
And it's not in bad condition considering where it was found...

The beads are SO tiny, I would estimate they're about size 16-0.

More photos to come!
(These old patterns convert well to loomwork and square stitch.)
~~~~~~~~~~


Monday, September 1, 2014

Wooden Spools for Seed Beading

Just listed these walnut-colored tiny wooden spools in my Etsy shop:

I like to stitch a band of seed beads around the recessed part of the spool,
then string them onto larger strands of beads.

Here's a necklace I made using plain wooden spools which I painted black,
for Jean Campbell's The Art of Beaded Beads.

Basically, you can use tubular peyote stitch and sew a tube around the spool.
Or you can create a swatch of flat peyote stitch, then zip it up around the tube.
~~~~~~~~~~

Thursday, August 28, 2014

Embroidery Tutorial with French Coiled Wire Bullion

Here's a simple video tutorial on how to embroider with that coiled wire bullion from India. It used to be impossible to find, but now it's readily available in several colors. (Click here to search on Etsy.) Basically you snip several lengths and then string them on your needle as you would a long bugle bead. But unlike glass bugle beads, you can get curved effects with the flexible coiled wire.

~~~~~~~~~~

Sunday, August 17, 2014

The Springs

Near Richmond, Kentucky circa 1980
In a country without saints or shrines
I knew one who made his pilgrimage
to springs, where in his life's dry years
his mind held on. Everlasting,
people called them, and gave them names.
The water broke into sounds and shinings
at the vein mouth, bearing the taste
of the place, the deep rock, sweetness
out of the dark. He bent and drank
in bondage to the ground.
--Wendell Berry 
~~~~~~~~~~ 


Thursday, August 14, 2014

Pipestone Cuff Bracelet WIP

Click the image for a close-up
Been picking my way through this bead embroidery project using
pipestone (bauxite) heishi. It is so exquisite but the holes are small so
I have to use a size 16-0 needle.

Click the image for a close-up
Ingredients are freshwater pearls, Czech glass nailhead beads,
Czech charlottes (true-cuts), and the pipestone heishi sprinkled
with antique faceted steel cut beads.
~~~~~

Monday, August 4, 2014

Art School

"It's like you're walking around with this enormous suitcase full of magic and you are never allowed to open it, because the rules say that the things in that suitcase are not worthy of artistic consideration. Worlds, childhood memories, pretend, fantasy, archaeology -- all that. And so, until I could open that suitcase, I didn't really have anything to work with. It was like trying to paint with your hands tied behind your back." 
-- Melissa Zink

The other day while on my walk I took a quick detour into the Albuquerque Museum, where I was reminded how much I love the exhibit there of many fine contemporary New Mexico artists. Since I seem to be revisiting my own experiences in the UNM art department in the early 1980's, I especially liked this quote by Melissa Zink, who managed to survive art school, marriage, and children to eventually become a  full-time artist in northern New Mexico.

Here is more about Melissa and her artwork:


~~~~~~~~~~


Monday, July 7, 2014

Book Review: Break the Rules Bead Embroidery

Diane's Beaded Dolly from the gallery section of the book
This book is awesome! It has everything I love -- beads, Frozen Charlotte dolls, and obscure Beatles references! Just out by Diane Hyde, it contains nearly two dozen projects that combine all kinds of non-bead materials in jewelry pieces that rely on bead stitching and bead embroidery to tie everything together.

Shells, thimbles, miniature dollhouse accessories, spoons, pen nibs, corks, eyeglass lenses -- all are captured and tamed in Diane's deft, original designs for pendants, necklaces, art dolls, earrings, bracelets, and more. I especially like her instructions for working with parts of porcelain trinkets. You should see the hens and chicks cuff bracelet. Seriously!

The materials are clearly listed along the outer page margins. My slight complaint is that tools aren't listed separately from supplies, but they are mostly contained toward the bottom of each list. The book contains abundant photographs and full-color illustrations, with instructions listed step-by-step, and headers for separate parts of the project.

Smart, smart creations by a gifted designer. It's not easy to integrate beads with objects, but Diane's use of color and proportion make the pieces work. If you're not into found objects, this book would not be for you. If you're fairly new to general jewelry and finishing techniques (for example, resins, sealers, drills), you will learn a lot with this book. As far as beading level of difficulty, I would recommend this book for intermediate level beaders who can manage a needle and thread and perhaps know a couple of simple stitches already.

Break the Rules Bead Embroidery: 22 Jewelry Projects Featuring Innovative Materials, by Diane Hyde (Lark Crafts)

Grade A+ Break the Rules Bead Embroidery: 22 Jewelry Projects Featuring Innovative Materials

Diane's website is www.dianehyde.com. While you're there, check out her very classy beadpunk gallery
~~~~~~~~~~


Sunday, June 29, 2014

Feather Charms Tutorial


I've been making pendants using a bunch of found objects. It's so handy to know how to convert everyday things into hang-able charms. Feathers are a great example. There are a few techniques to choose from, but I like this one best because it's quick and easy, and also durable enough for jewelry projects.

You'll need just a few SUPPLIES: 
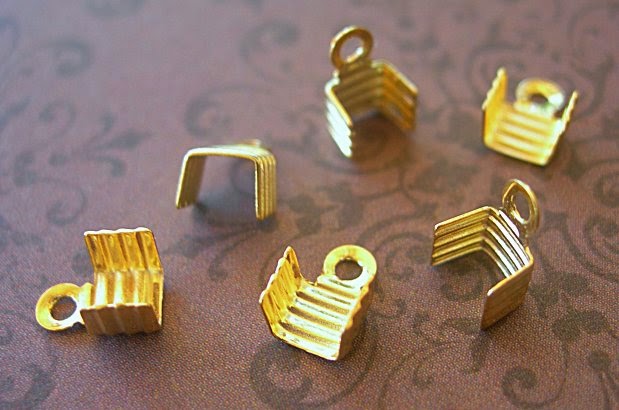
  • Fold-over cord end findings in gold or silver tone (I get mine from Rings and Things.)
  • A few feathers, any sizes and colors
  • Craft glue (I like The Ultimate from Crafter's Pick, available in hobby stores or online, because it's tacky, low toxicity, and dries clear and flexible.)

Fold-over Cord Ends
Clear drying, flexible craft glue
TOOLS
  • Craft knife, small sharp scissors, or a single-edge razor blade
  • Wide flat-nosed jewelry pliers

STEP-BY-STEP
1. First, prepare the feathers. If the fluff goes all the way to the end, strip it off by pulling up the shaft on both sides. (You can put more than one feather inside the crimp, if the shaft is small.)

2. Before you glue, fold in one side of the finding. Don't fold in too much, though, or it will be too difficult to insert the feather and apply the glue. This little step makes it a lot easier to crimp the first side all the way down, while holding the feather and wet glue in place.

3. Next, lay the feather inside the finding with the end of the shaft sticking up past the top of the finding, so that it overlaps the hanging loop or even extends above it a little bit. (You'll trim this off later...)

4. Apply a bit of clear-drying craft glue inside the finding, covering the feather end. I usually squeeze out a dab of glue onto a piece of scrap paper, then pick up a small amount with a toothpick.  If you apply too much, just wipe off the excess later, after you close the finding completely.

5. Holding the feather in place inside the finding, grab your pliers and fold the 1st side in by squeezing the pliers tightly, leaving the 2nd half unfolded for now.

6. To close the 2nd side, grasp it with the pliers and pull it inward toward the center, as you did with the 1st side. Then switch plier positions and squeeze the 2nd side down over the 1st side. Finally, squeeze very tightly across the whole finding to make it as flat as possible.

7. Wipe off any excess glue before it sets, then let the glue dry completely.

8. Once the glue is dry, use your razor blade or craft knife to slice off the end of the shaft that sticks up past the top of the cord end. This creates a clean, finished look.

This is such a quick and easy way to make feathers hang-able. I made the samples for this tutorial in less than 5 minutes! Try using foldover crimps with other things like leather strips, fabric, lace, or millinery flowers.
~~~~~~~~~~

Wednesday, June 18, 2014

Crystal Katana Rhinestone Pusher


I've been growing accustomed to Kellie DeFries' Crystal Katana tool for placing rhinestones, chatons and other fine geegaws into 2-part epoxy resin clay. The tool works great for that -- I like the wide barrel, so your hand doesn't get tired. But it's not too heavy to flip around when you need to use the other end. I find that placement is easier than the little ball of wax on a toothpick, which can stick too much.

This video shows some other kinds of projects -- how to glue flat-backs to plastic headphones, using white glue; how to use E6000 to bling some shoes; and how to use 2-part liquid epoxy to glue crystals to a metal license plate cover. Great information here...
~~~~~~~~~~

Saturday, June 14, 2014

Geishas have unusual pets

Out for a little walk in the moonlight...

Mixed a little 2-part epoxy resin clay (Crystal Clay brand) to attach the hanger.
Made a couple of pendants with the leftover clay.

Next project!
~~~~~~~~~~